


How to Install Roman Shades
Thank you for your purchase. Please read all instructions before beginning your installation.
Standard Installation Instructions
Mounting Hardware Kit Includes
- Mounting Bracket with Wing Nut 2 for shades up to 18" to 42" wide 3 for shades from 42 1/2" to 84" wide 4 for shades from 84 1/2" to 96" wide
- Bracket Screw – 1 inch 2 for shades up to 18" to 42" wide 3 for shades from 42 1/2" to 84" wide 4 for shades from 84 1/2" to 96" wide
- Cord Cleat and Screws: Provided with all standard cord lift shades.
Step 1. Installation
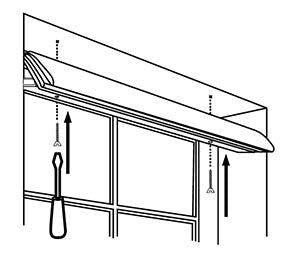
For Outside or Wall Mount:
- Position brackets 1 to 2 inches from the end of the head rail. If provided, position middle brackets to align with pre-drilled holes in the head rail.
- Hold the shade in place and mark the desired bracket locations with a pencil. Use a level to ensure the brackets are straight.
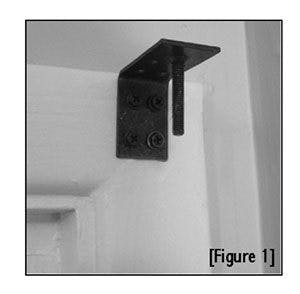
- Pre-drill the mounting holes into the mounting surface. Next, screw the brackets in place into the mounting surface. [Figure 1]
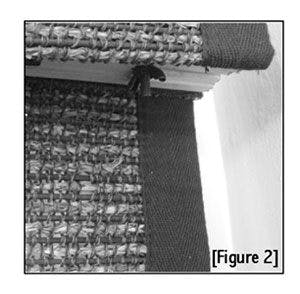
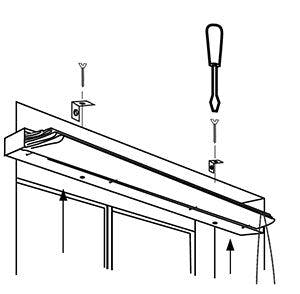
- Hold the shade so that the screw posts on the brackets fit through the slots in the head rail and re-attach wing nuts and screw tight to hold the head rail firmly. Ensure that the shade is level. [Figure 2]
For Inside or Ceiling Mount:
- Position brackets approximately 1 inch from the ends of the head rail. If provided, position middle brackets to align with pre-drilled holes in the head rail.
- Measure 1 inch in from each side of the window frame and mark bracket locations with a pencil.
- Pre-drill the mounting holes into the mounting surface. Next, screw the brackets in place into the mounting surface. [Figure 1]
- Hold the shade so that the screw posts on the brackets fit through the slots in the head rail and re-attach wing nuts and screw tight to hold the head rail firmly. Ensure that the shade is level. [Figure 2]
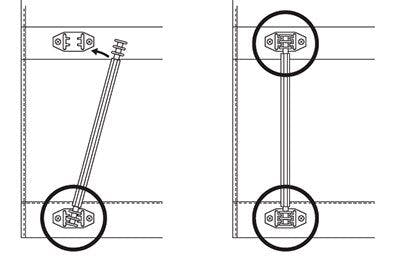
Step 2. Installing the Cord Cleat:
Optional. Your shade is fitted with a cord lock, which allows the shade to stay in whatever position you desire. However cord cleats help keep cords tidy and away from children. We strongly recommend the use of cord cleats to help prevent the risk of strangulation.
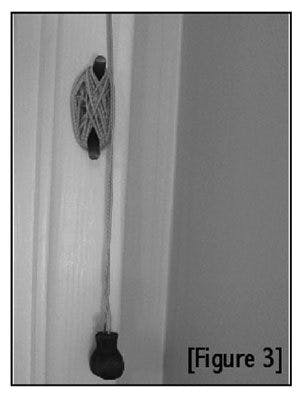
- Find a convenient place about 1 inch out from the side of the shade where the cords are located and about one quarter of the way up from the bottom of the shade.
- Hold the cord cleat parallel with the frame of the window. With a pencil, make a mark through the holes.
- Make pilot hole and install cord cleat with 2 screws. [Figure 3]
Deluxe Corded Installation Instructions
Tools you will need
- Power drill and drill bit
- Measuring tape
- Screwdriver
- Level
- Pencil
- Step stool
Mounting hardware kit includes the following:
- Mounting Brackets 2 (shades up to 36" wide) 3 (shades 36" to 48" wide) 4 (shades 48" to 96" wide) 5 (shades 96" to 120" wide)
- 1-1/4" Screws 2 (shades up to 36" wide) 3 (shades 36" to 48" wide) 4 (shades 48" to 96" wide) 5 (shades 96" to 120" wide)
- 3/4" Screws 2 (shades up to 36" wide) 3 (shades 36" to 48" wide) 4 (shades 48" to 96" wide) 5 (shades 96" to 120" wide)
For Inside Mounting:
Mounting holes are pre-drilled in the Head Rail. Screw the 11/4" screws into the head rail until the tips of the screws extend very slightly beyond the top of the head rail. Align the front of the shade with the front edge of the window opening (or position as desired), making sure that the shade is centered in the window opening — then push up on the screws so that the screw heads leave tiny impressions in the top of the window frame. Now, use the impressions as a guide and pre-drill the mounting holes using a 5/64" drill bit — then screw the shade in place.
For Outside Mounting
One bracket should be positioned about 2" to 6" from each end of the head rail. For wider shades that require 3 or more brackets, these should be spaced evenly between the two outermost brackets. Hold the shade in place and mark the desired bracket locations with a pencil.
The brackets must be level — use a Spirit Level if necessary to assure proper alignment. The brackets will be attached to the top of the head rail, so attach the brackets to the wall or window frame first. Pre-drill the mounting holes using a 5/6 4" drill bit, and then screw the brackets in place.
Place the head rail against the brackets as illustrated — center the shade over the window opening — then mark the location of each mounting hole on the head rail. Pierce the fabric at the hole locations using the tip of a screw, then pre drill the mounting holes using a 5/6 4" drill bit. Attach the shade to the brackets using the 4" screws provided.
Deluxe Cordless Installation Instructions
Tools you will need
- Screwdriver
- Measuring tape
- Pencil
- Power drill
- Step Ladder
Mounting hardware kit includes the following:
- Mounting Brackets 2 (shades up 24" to 36" wide) 3 (shades 36 1/8" to 54" wide) 4 (shades 54 1/8" to 84" wide)
- 1-1/8" Screws 2 per bracket
- Control Handle 1 (attaches to bottom rail)
Step 1. Attach Pleat Stiffeners
If the Pleat Stiffeners are not pre-attached, snap them onto the bottom hem as illustrated, by pressing down firmly on each end of each stiffener. Do not press down in the center of the stiffener as it can break. The bottom pleat must have rigidity in order for the shade to function properly.
Step 2. Bracket Location and Installation
Your shade may be installed either inside the window frame or outside the window frame.
A mounting bracket should be positioned about 1" to 6" from more brackets, these should be spaced evenly between the two outermost brackets. Always position the brackets such that there is no interference with the cords and mechanisms inside the head rail. The procedure outlined below will assure proper bracket placement.
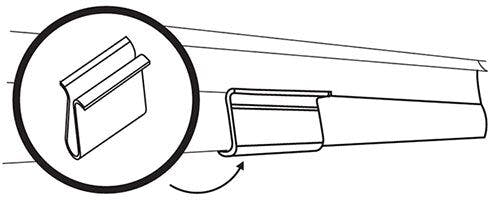
To attach the brackets the locking arm should be facing out. Then position the bracket so that it engages the inner front and inner back of the bracket, and then push the locking arm inward to lock it in place.
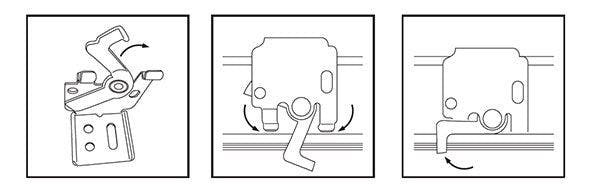
Step 3. Securing the Head Rail
Place the head rail on the brackets as described in Step 4 above, and lock in place. Check carefully to assure that each bracket is properly secured.
Step 4. Attach Handle / How to Operate
Attach the handle to the bottom of the shade as illustrated. The handle is designed to minimize contact with the shade fabric. Always raise and lower the shade slowly to assure that the fabric gathers neatly.
To lower the shade: grip the handle and slowly pull straight down.
To raise the shade: put one hand under the handle (palm facing up) and lift slowly until the desired height is reached.
IMPORTANT: Always push and pull at the center of the shade to assure that the bottom of the shade remains even (i.e. parallel to the top of the shade). If the shade becomes uneven, slowly pull it all the way down, and then lift to the desired position. If necessary, reach behind the shade and manually pull the cording slowly out of the head rail until the bottom of the shade is level.
Installation Instructions for Motorized Roman Shades
Note: Motorization is only available on deluxe colors
Care Instructions
The packaging and shipping of soft treatments frequently results in minor wrinkling of the fabrics used. There are different characteristics and handling needs for the variety of fabrics offered in this program. Please refer to the descriptions below for guidance on how to remedy minor wrinkles upon delivery. First, allow all items to hang for a few days so wrinkles relax and begin to fall out.
- Silk fabrics: Natural irregularities give the fabric its unique and desired character. The appearance of slubs, nubs, loops and barre ridges are universally accepted as normal and should not be considered defects. If necessary, steam silk to remove stubborn wrinkles. Please note that a good quality steamer is needed so water spots won't form from water spitting out from the steaming device.
- Rayon/Poly blends: If necessary, steam rayon/poly to remove stubborn wrinkles. Please note that a good quality steamer is needed so water spots won't form from water spitting out from the steaming device.
- 100% Polyester: If necessary, steam polyester or gently iron on a low heat setting to remove stubborn wrinkles. 100% Polyester fabrics release wrinkles easily. Steam or iron on the Polyester / Synthetic Fabrics setting (Low), but be aware that Polyester will melt if the iron is too hot.
- Cotton/Poly blends: If necessary, gently iron on a Blended Fabric (Medium) setting to remove stubborn wrinkles.
- 100% Cotton and 100% Linen: If necessary, gently iron on a Cotton (High) setting to remove stubborn wrinkles.
- General Cleaning Guidance: Dry Cleaning is the best method to clean soiled soft window treatments. However, on 100% Polyester, Cotton/Poly blends and 100% Cotton or 100% Linen you may: Spot clean with warm soapy water using mild detergent and a clean sponge. Air-dry and then steam or iron as guided above.