


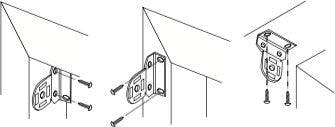
Step 1. Mount the Brackets
Attach the brackets to the window frame, molding or ceiling as shown. The brackets are "universal" – there are no "right" and "left" brackets. Mark the screw locations with a pencil – pre-drill the screw holes using a 5/64" drill bit.
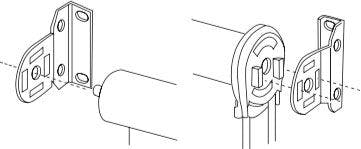
Step 2. Install the Shade
Put the spring loaded pin into the round hole of the bracket, push the spring loaded tip into the bracket, and then insert the hook arms on the opposite side of the shade into the two hook arm receiver holes of the bracket. Once the two hook arms are through the holes, gently pull down until the two hook arms have locked securely to the bracket. For cord control shades, the bottom of the clutch should always point straight down.
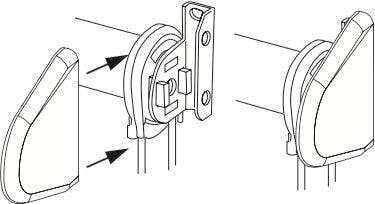
Step 3. Install the Bracket Covers – For Outside Mount Shades Only!
Bracket covers slide onto the brackets as shown until they snap into position.
Step 4. Install the Chain Tension Device
The tension device must be installed to make sure the shade is fully operable.
Before doing anything, you must first slide the tension device to the bottom of the bead chain.
While holding the tension device in one hand, pull the plunger away from the bead chain with the other hand. Lift the bead chain out of the bead locking groove and slide the tension device to the bottom of the chain loop.
Pull the tension device down until the bead chain is fully tensioned (plunger will be at the top) and then move the tension device up approximately 1/8".
Mark the screw hole locations on the wall with a pencil.
Inside Mount:
If mounting into wood, pre-drill screw holes and then install the tension device using the 11/4" Phillips head screws provided.
If not securing into wood, use appropriate anchors for the substrate and follow anchor manufacturer's instructions.
Outside Mount:
Align the mounting bracket screw holes with the pencil marks.
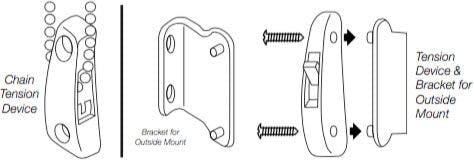
If mounting into wood, pre-drill screw holes and then install the mounting bracket using the 11â„4" Phillips head screws provided.
If not securing into wood, use appropriate anchors for the substrate and follow manufacturer's instructions.
Press the tension device onto the mounting bracket posts. Carefully attach the Tension Device to the bracket using the 3/8" Phillips head screws provided. DO NOT OVER-TIGHTEN.
Step 5. Operating the Shade
Pulling gently on the cord in one direction raises the shade; pulling it in the other direction lowers it. On shades where the fabric rolls against the window, the front cord lifts the shade. On shades where the fabric rolls toward the room, the rear cord lifts the shade.
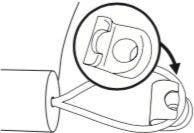
Step 6. Hold Down Brackets for Outdoor Shades
The elastic straps on each side of the bottom rail loop onto the open 'C' section of the hold down brackets as illustrated. Attach the hold down brackets to a wall, post or other solid surface. Use 1" screws (or screws and anchors) to attach the brackets. Put tension on the straps by stretching them when positioning the brackets.
Cleaning the Shades
Use a cloth, sponge or soft brush and a mild detergent. Use warm or cold water, not hot water.