


Step 1. Check Package Contents
- Mounting Brackets 2 for shades up to 45" wide 3 for shades up to 72" wide
- Extension Brackets (for outside mounts) 2 for shades up to 45" wide 3 for shades up to 72" wide
- Screws 4 for shades up to 45" wide 6 for shades up to 72" wide
- Wall Anchors 4 for shades up to 45" wide 6 for shades up to 72" wide
Step 2. Installation
Your blind may be installed either inside the window frame or outside the window frame.
Wallboard or Plaster: use wall anchors. Concrete, Stone, Brick: use a masonry drill bit and anchors or screws specifically designed for masonry (not included).
Inside Mounting
One bracket should be positioned about 2" to 6" from each end of the head rail. For wider shades that require 3 or 4 brackets, these should be spaced evenly between the two outermost brackets.
Attach each bracket to the inner top of the window opening using the screws provided. Pre-drill the screw holes. The extension brackets are not used for inside mounts.
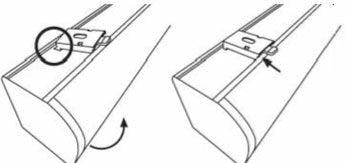
For flush inside mounts, attach the brackets to the head rail first (see drawings and attachment instructions below), and then position the shade in the window opening as desired. Then make pencil marks at the back of each bracket Remove the brackets by pressing on the plastic tab. Align the brackets with the pencil marks, and then screw them in place as described above.
Outside Mounting
Attach the tension Brackets to the wall or window framing. One bracket should be positioned about 2" to 6" from each end of the head rail. For wider shades that require 3 or 4 brackets, these should be spaced evenly between the two outermost brackets. Pre-drill the screw holes.
The brackets must be level - use a level if necessary to ensure proper alignment.
Then attach a Mounting Bracket to each Extension Bracket using the n and bolt pre-attached to each Extension Bracket.
To adjust head rail extension, remove the shade from the mounting brackets by pressing on the plastic tabs at the front of each bracket. Then loosen the nut and bolt, and move the mounting brackets forward or backward as preferred.
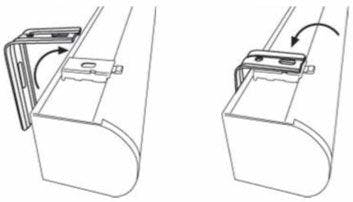
Step 3. Securing the Head Rail
Slide the inner rear of the head rail onto the metal tabs at the back of the brackets, and then push up to lock the head rail in place. Check carefully to assure that each bracket is properly secured.
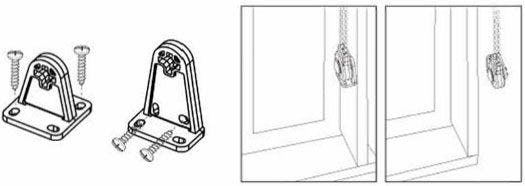
Step 4. Attach the Safety Cord Guide
The cord guide must be attached per these instructions in order for your shade to function properly.
Install Mounting Bracket
Determine which direction the mounting bracket will face relative to the Tension Device. Make sure the Tension Device will be snapped into the mounting stand in the same correct direction. Before attaching Tension Device to the base, measure and mark the location in the window where the tension device will be mounted Mount the base in position without the tension device attached. Position the Tension Device on the window frame or the wall so that the Tension Device and control cord/chain does not interfere with raising or lowering the shade. The Tension Device should be installed so that cord/bead chain hangs loosely - do not stretch or pull down on it. Stretching the cord/bead chain will cause excessive wear. Do not twist or cross the control cord/bead chain. In order to position the base properly, adjust the cord so that the Cord Guide is at the bottom of the cord loop and let it hang freely. Hold the tension device and the bracket against the window frame or wall and mark the position of the bracket (mark the location of the screw holes) with a pencil. Insert and secure two screws through the holes in the mounting bracket. The mounting screws must be secured into a solid surface or wall anchors.
On inside mount shades the Tension Device may be mounted to the side window frame or when the treatment spans beyond the window frame it may be mounted to the wall.
Mate Tension Device To Mounting Bracket
Once the tension device is snapped to the base it is designed not to be removed.
Press center round button exposing the four latching legs and press into the corresponding thru-hole of the mounting bracket stand until the latches snap and lock to the mounting stand. The loop should now pass freely through the Tension Device.
Step 5. How to Operate
To raise or lower the shade, pull the lift cord.
Installation Instructions for Motorized Roller Shades
Note: Motorization is only available on deluxe colors
Cleaning
To clean the shade fabric, use a feather duster or vacuum lightly using the soft brush or upholstery attachment. For spot cleaning, use warm (not hot!) water with a mild soap to damp clean.