Thank you for your purchase. Please read all instructions before beginning your installation.
Standard Woven Wood Installation Instructions
Click here to view the standard Woven Wood Installation Instructions.
Deluxe Woven Wood Installation Instructions
Tools you will need
- Pencil
- Screwdriver
- Level
- Drill
- Drill Bits
- Scissors
Hardware Included
- Installation Brackets
- Mounting Screws
- Additional Mounting Brackets (If required for extra support)
Before mounting the shade
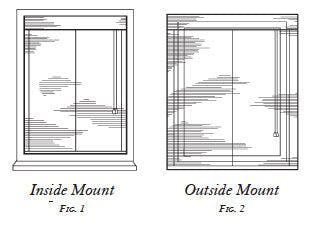
Determine if shade is made for inside or outside installation. (See Figs. 1 and 2.)
If shade is for inside window installation, and if the window frame is not even or level (Fig. 3 ), use shims to make sure that the headrail will be level when installed. (See Fig. 4)
Even if the headrail is mounted on the frame, wall or ceiling, it must be level, so the shade will operate properly. Also make sure that shade is the proper length and that it will clear any obstructions.(Spacers or extension brackets may be required for shade to clear any obstructions.)

Step 1. Mounting the Shade
Inside Window/Ceiling Installation
- Shade is fabricated to fit inside the window casement.
- While holding the headrail firmly against the casement, drill 1/16" pilot holes into the casement through the small round holes in the headrail. (Do not drill pilot holes through the slots in the headrail.)
- Use the 2-inch wood screws to attach the shade to the window casement. If shim is used to level headrail, make sure that it is in place before tightening screws.

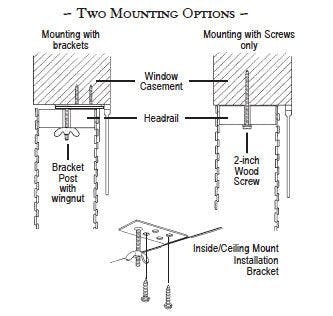
Frame or Wall/Ceiling Installation
- Shade is fabricated to overlap the window opening. The installation brackets are mounted to window frame or wall.
- While holding the headrail level against the window frame or wall, lightly mark on the mounting surface the positions of the headrail slots.
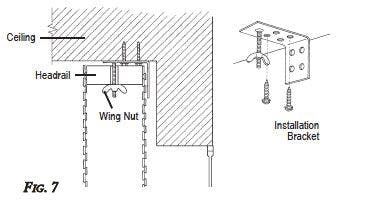
- Hold each installation bracket against the mounting surface and mark for two diagonal screw holes. (Fig. 5.) Position brackets to line up with centers of slots in headrail. Drill pilot holes and use appropriate fastener screws, wall anchors or toggle bolts to mount brackets.
- Push the headrail up onto the brackets so that the threaded posts on the brackets fit through the slots in the headrail. (See Fig. 6.)
- Secure the headrail to installation brackets by tightening wing nuts. (See Fig. 7.)
Step 2. Shade Adjustment
Your shade has been carefully inspected and adjusted to operate properly. Once installed however, minor adjustments may be necessary.
- The yarn in your Woven Wood shade is flexible enough to straighten to window opening by stretching the yarn. Pull down on the short side to eliminate unevenness and align the shade.
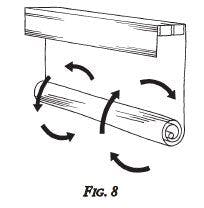
- If the shade is not flat when lowered, roll the shade tightly from the bottom and then twist the roll from the ends (one end clockwise and the other counter-clockwise) to align yarn and slats. (Fig. 8)
- Should a strand of yarn slip out from the edge of the woven wood fabric, it may be removed with scissors (from top to Fig. 8 bottom of shade) without affecting the strength of the shade.
Installation Instructions for Motorized Bamboo Shades
Note: Motorization is only available on deluxe colors
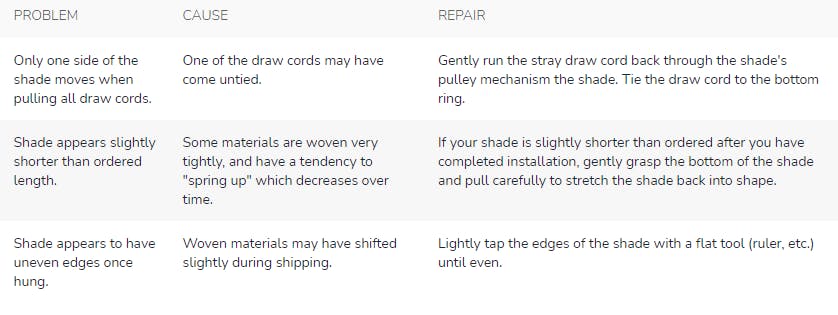
Troubleshooting
Each woven wood shade has a very unique style, composed of a variety of natural materials originating from many points across the world: bamboo, reeds, jute, rattan, grasses, and woods. Slight imperfections and variations in color are all part of the natural beauty of this type of product and should not be considered flaws. Due to the woven construction of your shade, materials may have shifted slightly during shipping. Use the guidelines below to realign your shade. If you have any questions, call your dealer for advice.