


Thank you for your purchase. Please read all instructions before beginning your installation.
Standard Installation Instructions
Step 1. Prepare Brackets
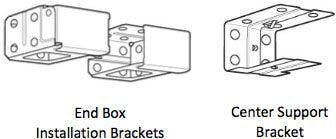
Prepare box brackets for installation
Open the front of the bracket by pressing on the bottom of the bracket to release the locking tab while lifting the front gate.
Use the following # of Center Support Installation Brackets based on the Blind Width:
- UP TO 49" - 0
- 49 1/8" - 72 7/8" - 1
- 73" AND GREATER - 2
Step 2. Mark the Bracket Locations
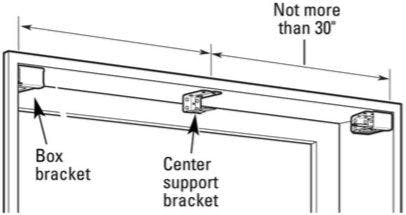
Outside Mount
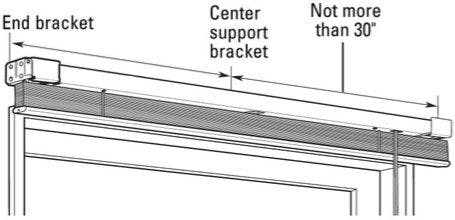
Position the box brackets at each end of the headrail. When using a single center support bracket, center it between the box brackets. For more than one center support bracket, space the support brackets evenly, not more than 30" apart. Make sure the brackets will not interfere with the cord mechanism or any other internal parts. Mark the bracket for mounting hole locations, making sure they are square and equally spaced. For outside mount installations, use a level to check for levelness.
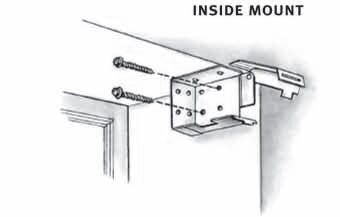
Inside Mount
Position the box brackets at each end of the headrail. Depending on the installation location, box brackets can be attached using the top, back, or side holes. When using a single center support bracket, center it between the box brackets. For more than one center support bracket, space the support brackets evenly, not more than 30" apart. Make sure the brackets will not interfere with the cord mechanism or any other parts. Mark the location of the desired bracket mounting holes, making sure that they are square and equally spaced.
Step 3. Bracket Installation
Outside Mount
Screw brackets into wall as shown.
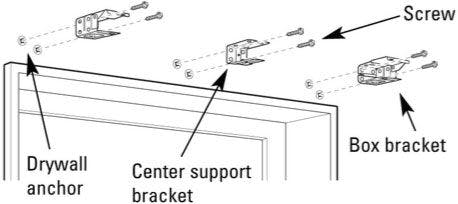
Inside Mount
Screw brackets in window frame as shown.

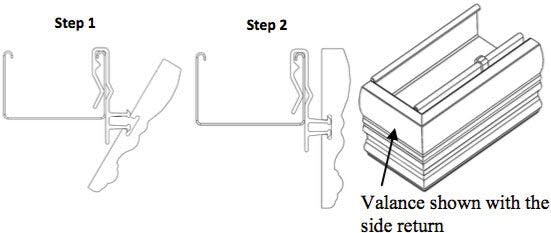
Step 4. Valance Installation
Attach the loose plastic valance clips (Part 1) to the front of the headrail, one at each end. Space any remaining clips evenly. Press the other side of the plastic clip (Part 2), which is already screwed to the valance, to Part 1. The two parts of the valance clip should snap together.
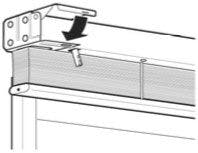
Step 5. Blind Installation
Align the headrail with the center support and box brackets. The headrail should have the tilt mechanism facing toward the room. Be careful not to trap the top slat in the brackets and slide the headrail straight back until it is snug in the brackets. If the headrail can slide from side to side in the box brackets, you can use a flat head screwdriver to bend out the tabs on the end of the until it is snug.
Lower the front gate of each box bracket and press until the locking tab clicks into place.
Operating Instructions
- To lower the blind, pull the cord down and towards the center of the shade to unlock the cord. Then, slowly release the cord until the shade reaches the desired location. Move the cord past the outer edge of the shade and let go to lock the cord.
- To raise the blind, pull the cord straight down until the shade reaches the desired location. Move the cord past the outer edge of the shade and let go to lock the cord.
Deluxe Installation Instructions
Tools you will need
- Pencil
- Screwdriver
- 1/4" nut driver
- Level
- Pliers
- Drill with 7/64" drill bit
Step 1. Getting Started
Your brackets must be securely attached to the mounting surface. When screwing into a surface, the included screws must hit wood studs. Otherwise, use a secure fastener (not included)
Important: When selecting a fastener, make sure it is designed to support the weight of the blind being installed. Follow the fastener manufacturer's instructions for proper installation of the fastener.
Step 2. Installing Your Blind
Step 2a. Inside Mount
Place mounting brackets level and flush with window frame. Screw into the window frame through the holes on the inside of the bracket. If using the center support brackets, proceed to Step 2c. Otherwise, proceed to Step 3.
Step 2b. Outside or Ceiling Mount
Hold the blind in desired position and mark the window frame or ceiling 1/4" past each end of the headrail with a pencil. Remove blind and place mounting brackets level on pencil marks. Be certain that the mounting brackets are aligned with screws. If using center support brackets proceed to Step 2c. Otherwise, proceed to Step 3.


PLEASE NOTE: Blinds with ladder tapes may require brackets installed 1/4" lower to ensure proper blind operation. Use the bracket shims provided.
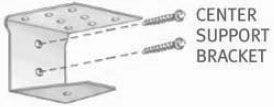
Step 2c. Attaching Center Support Brackets
For wider blinds you will need to install center support brackets.
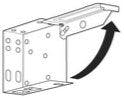
Center support brackets should be spaced evenly along the width of the blind, aligned with tops and backs of end brackets. If needed center support brackets can be attached to an extension bracket as illustrated. Make sure the brackets are positioned so they do not interfere with the operation of blind. Proceed to Step 3.
Step 3. Attaching the valance clips
Snap the plastic valance clips on to the front of the headrail. Make sure the clips are in alignment with the mounting strips on the back of the valance. Proceed to Step 4.

Step 4. Installing the blind
Check blind to ensure that all cords and ladders hang freely. Open the bracket door latches by pushing up on bottom of bracket while lifting the bottom of bracket door up. Slide the headrail into the mounting brackets. Close bracket door latches into locked position. For blinds with wand control proceed to Step 5. All others proceed to Step 6.

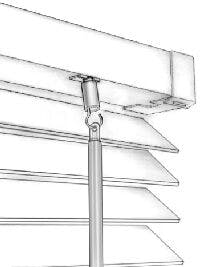
Step 5. Attaching the wand
Slide the plastic sleeve up to expose the hook opening.

Holding the plastic sleeve above the hook, slide the hole in the end of the wand onto the hook.
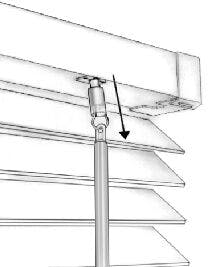
Slide the plastic sleeve down.
Step 6. Attaching the valance
Snap the valance into the plastic valance clips, starting from the center of blind headrail and finishing one side at time. For outside mounts, if side returns are too long, they can be trimmed to size with a finetooth saw.

Operating your blind
To raise or lower blind, tilt slats so that they are in the "open" position, then pull cord toward the middle and down to release the cord lock. When the blind is at desired height, return cord to the vertical position to engage the cord lock.
Removing your blind
First, remove the balance from the blind. Start at one end of the of the blind and insert a flat blade screwdriver into the spot on the top, front of each mounting bracket. Push the screwdriver in toward the blind, The groove on the front of the headrail will disengage from the bracket allowing the blind to be removed.
Installation Instructions for Motorized Wood Blinds
Note: Motorization is only available on deluxe colors
Troubleshooting
My blind doesn't lift.
Check to make sure cord is not caught in headrail. If hold down clips were used, make sure they have been released.
My blind will raise and lower but will not tilt.
Your brackets may be mounted too close to the top of the window casement, causing the tilt mechanism to bind. If your blind has decorative cloth tapes use the shims provided to lower the blind, OR
Check inside the headrail for obstructions. Make sure all of the slats are laying properly on the ladders.
My blind raises unevenly.
Raise blind to the "up" position, pull each cord until the blind is all up. Pull the blind down.
My slats are hanging out of alignment.
Lower the blind completely. While firmly holding the bottom rail, gently tug on the lift cords until the slats are even.
My inside mounted blind slides back and forth between the brackets when operated.
Using a screwdriver, bend out the adjustable end tabs on the sides of the headrail.
Care and cleaning
Minimal care and cleaning is needed to maintain the beauty of your blinds.
- To vacuum: Use brush or dust head attachment.
- To dust: Use soft, clean cloth.