


Step 1. Prepare Brackets

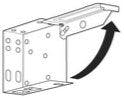
Prepare box brackets for installation:
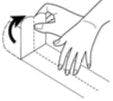
Open the front of the bracket by pressing on the bottom of the bracket to release the locking tab while locking the front gate.
Use the following # of Center Support Installation on Brackets based on the Blind Width:
- Up to 60" = 0
- 60 1/8" - 77 3/4" = 1
- 77 7/8" and Greater = 2
Valance Clips Needed
- Up to 35.99" = 2
- 36" - 59.99" = 3
- 60" - 83.99" = 4
- 84" - 131.99" = 5
- 132" - 155.99" = 6
- 156" and Greater = 7
For your convenience, extra valance clips are included.
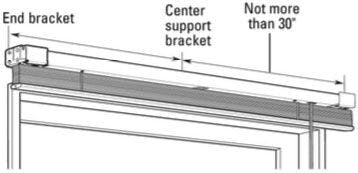
Step 2. Mark the Location
Outside Mount
Position the box brackets at each end of the headrail. When using a single center support bracket, center it between the box brackets. For more than one center support bracket, space the support brackets evenly, not more than 30" apart. Make sure the brackets will not interfere with the cord mechanism or any other internal parts. Mark the bracket for mounting hole locations, making sure they are square and equally spaced. For outside mount installations, use a level to check for levelness.
Inside Mount
Position the box brackets at each end of the headrail. Depending on the installation location, box brackets can be attached using the top, back, or side holes. When using a single center support bracket, center it between the box brackets. For more than one center support bracket, space the support brackets evenly, not more than 30" apart. Make sure the brackets will not interfere with the cord mechanism or any other parts. Mark the location of the desired bracket mounting holes, making sure that they are square and equally spaced.

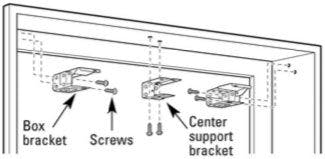
Step 3: Bracket Installation
Outside Mount
Screw brackets into wall as shown.

Inside Mount
Screw brackets in window frame as shown.
Step 4. Valance Clip Installation
Attach the plastic valance clips to the front of the headrail, one at each end. Space any remaining clips evenly. Hold the valance into the clips.

For Outside Mount Valances
For aluminum blinds ordered as outside mount, the aluminum slats used for the valance, will be made wider than the headrail. Attach the slats to the plastic valance clips, and then bend both the left and right sides of the valance so that the aluminum valance slats cover the box installation brackets.
Step 5. Blind Installation
Align the headrail with the center support and box brackets. The headrail should have the tilt mechanism facing toward the room. Be careful not to trap the top slat in the brackets and slide the headrail straight back until it is snug in the brackets. If the headrail can slide from side to side in the box brackets, you can use a flat head screwdriver to bend out the tabs on the end of the until it is snug.

Lower the front gate of each box bracket and press until the locking tab clicks into place.

Step 6. Operating Your Blind
To lower the blind, pull the cord down and towards the center of the shade to unlock the cord. Then, slowly release the cord until the shade reaches the desired location. Move the cord past the outer edge of the shade and let go to lock the cord.
To raise the blind, pull the cord straight down until the shade reaches the desired location. Move the cord past the outer edge of the shade and let go to lock the cord.